申请SSL证书的方法很多,有收费的,也有免费的。收费的申请比较简单,腾讯云、阿里云等大厂都有。
这里使用certbot通过cloudflare的API key申请免费的Let’s Encrypt证书。
一、获取cloudflare API Key
注册cloudflare账号、登录、托管域名过程省略。
查看API Key:
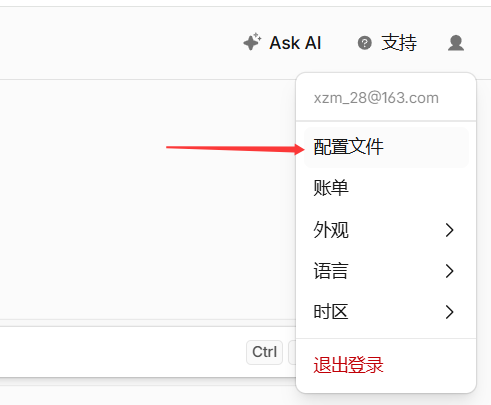
登录后,点击右上角的头像–>配置文件,如下图:
然后,点击左边的API令牌–>Global API Key,点击查看,如下图:
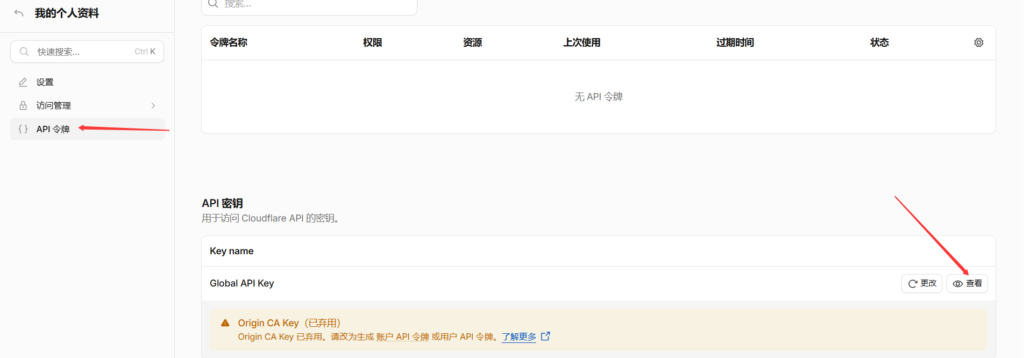
这样就可以得到API Key了。
当然,也可以创建API令牌:
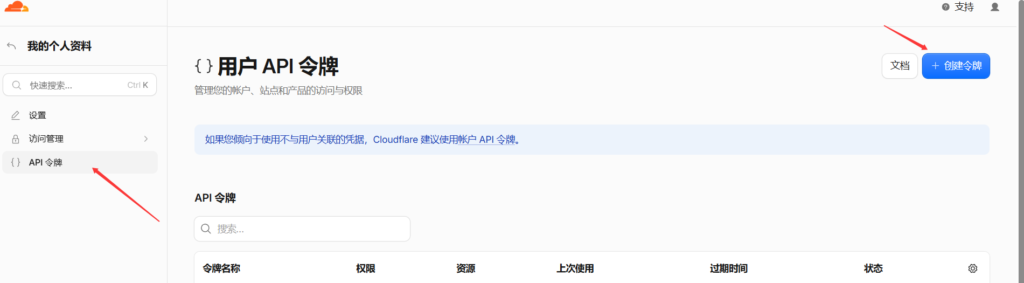
这里不演示创建API令牌。创建结果如下:
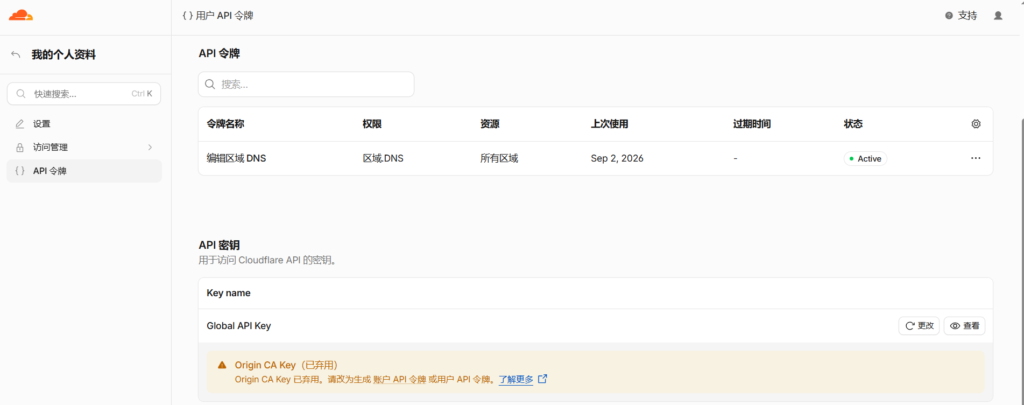
该令牌权限仅限于DNS编辑。
二、申请Let’s Encrypt证书
1、安装 certbot 、python3-certbot-dns-cloudflare
这里使用Ubuntu26.04系统
如果系统太旧了,可以先更新系统:
root@QQGV5DTy8tVzMoK:~# apt update && apt upgrade -y安装certbot 、python3-certbot-dns-cloudflare软件:
root@QQGV5DTy8tVzMoK:~# apt install certbot python3-certbot-dns-cloudflare -y红帽系统使用以下命令安装:
yum install -y epel-release
yum install -y certbot python3-certbot-dns-cloudflare
2、创建配置文件
创建一个名为/etc/letsencrypt/cloudflare.ini的配置文件
root@QQGV5DTy8tVzMoK:~# vim /etc/letsencrypt/cloudflare.ini
dns_cloudflare_email = XXXXX  # cloudflare注册的邮箱
dns_cloudflare_api_key = XXXXXX  #这里写Global API Key
然后,将该文件权限设为0400或0600或600:chmod 0400 /etc/letsencrypt/cloudflare.ini
3、申请证书
可以申请泛域名证书、普通域名证书:
root@QQGV5DTy8tVzMoK:~# certbot certonly -d '12300.cc.cd, *.12300.cc.cd' --agree-tos --email xzm_28@163.com --server https://acme-v02.api.letsencrypt.org/directory --dns-cloudflare --dns-cloudflare-credentials /etc/letsencrypt/cloudflare.ini --dns-cloudflare-propagation-seconds 30或者:
certbot certonly --dns-cloudflare --dns-cloudflare-credentials /etc/letsencrypt/cloudflare.ini -d "12300.cc.cd, *.12300.cc.cd" --server https://acme-v02.api.letsencrypt.org/directory参数解析:
certonly:表只申请证书,不自动安装或修改服务器配置
--dns-cloudflare:指定DNS验证方式
--dns-cloudflare-credentials:指定用于申请证书的cloudflare配置文件
-d:指定需要申请证书的域名,支持泛域名
--agree-tos:自动同意 Let's Encrypt 的服务条,跳过交互式询问,配合 -n(非交互模式)适合在脚本里自动化申请证书时使用
--email:指定用于注册和接收证书到期提醒的邮箱
--server:指定 ACME 服务器的地,也就是告诉 Certbot 该向哪个证书颁发机构发起请求。 使用 Let's Encrypt 时,这个参数后面通常跟官方 ACME v2 服务器地址
--dns-cloudflare-propagation-seconds:设置给DNS记录传播预留时间,避免验证失败。这里设为30秒
--non-interactive:非交互式执行,可简写为:-n
过程信息省略。申请成功如下图:
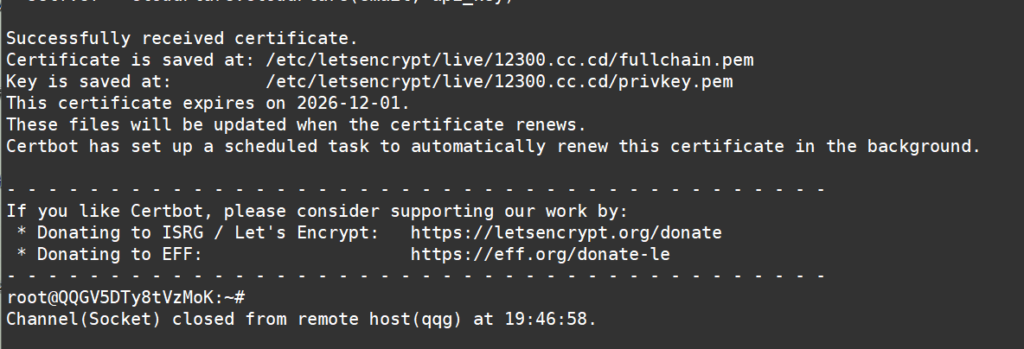
申请的证书保存在:/etc/letsencrypt/live/域名/目录中,如下图:

fullchain.pem:公钥
privkey.pem:私钥
4、证书更新
执行命令:certbot renew
三、其他申请方法
不需使用cloudflare API Key
第1种:使用snapd
1、安装snapd
snapd yum install snapd 2、启动
snapd systemctl start snapd
systemctl enable snapd
3、更新snapd版本
snap install core
snap refresh core
4、创建软连接
ln -s /var/lib/snapd/snap /snap 5、通过 snap 安装 certbot
snap install --classic certbot 6、申请证书
/snap/bin/certbot certonly -d "logmm.org" -d "www.logmm.org" -a webroot --webroot-path=/myweb/ --server https://acme-v02.api.letsencrypt.org/directory --key-type rsa-a webroot –webroot-path=:指定网站目录
或
/snap/bin/certbot certonly -d "logmm.org" -d "*.logmm.org" --manual --preferred-challenges dns-01 --server https://acme-v02.api.letsencrypt.org/directory --key-type rsadns-01:使用dns申请,过程中需要设置TXT解析【具体操作:见下面的第2种直接用certbot中有关操作】
7、证书更新
/snap/bin/certbot renew(1)certbot相关参数:
certonly :表示只申请证书,Certbot有很多插件比如ngixn或者apache。不同的插件都可以申请证书,用户可以根据需要自行选择。
-d :为哪些主机申请证书。如果是通配符,输入 *.xxx.com(根据实际情况替换为你自己的域名)
--preferred-challenges dns-01: 使用DNS方式校验域名所有权
-a/--authenticator webroot :  使用HTTP方式校验域名所有权,也可以用--preferred-challenges http-01
--manual :手动设置
--server: Let's Encrypt ACME v2版本使用的服务器不同于v1版本,需要指定
(2)校验域名的所有权的3种方式:
dns-01:给域名添加一个 DNS TXT 记录。
http-01:在域名对应的 Web 服务器下放置一个 HTTP well-known URL 资源文件。
tls-sni-01:在域名对应的 Web 服务器下放置一个 HTTPS well-known URL 资源文件。
第2种:直接用certbot
不使用yum,apt等安装certbot,使用git下载certbot:
git clone https://github.com/certbot/certbot.git
或
git clone https://gitee.com/bingool/certbot.git
申请证书:
cd certbot
./certbot/letsencrypt-auto-source/letsencrypt-auto  certonly -d *.logmm.org
需要修改dns的txt
第3种:使用acme.sh
1)下载acme.sh
root@QQGV5DTy8tVzMoK:~# curl https://get.acme.sh | shacme.sh 脚本默认 CA 服务器是 ZeroSSL,可改成letsencrypt
acme.sh --set-default-ca --server letsencrypt2)申请证书
有HTTP-01和DNS-01两种方式
· HTTP-01: 不支持泛域名证书
确保Web服务运行 :确保你的Nginx或Apache正在运行,并且配置好了对应域名的虚拟主机(server block)。
设置Web根目录 :你需要知道你的网站文件存放在服务器的哪个目录。例如,Nginx的常见根目录是 /usr/share/nginx/html 或 /var/www/html
root@QQGV5DTy8tVzMoK:~# cd .acme.sh/
root@QQGV5DTy8tVzMoK:~# ./acme.sh --issue --standalone -d  12300.cc.cd --webroot  /usr/share/nginx/html
· DNS-01验证(最通用、最推荐的方式):支持泛域名证书,需要添加txt解析
不依赖服务器端口,只要求你能操作域名的DNS解析。
./acme.sh --issue --dns --dnssleep 900 -d *.12300.cc.cd --yes-I-know-dns-manual-mode-enough-go-ahead-please–yes-I-know-dns-manual-mode-enough-go-ahead-please:是 acme.sh 在 DNS 手动模式下的确认参数,作用是告诉脚本“我知道这是手动 DNS 验证,并且愿意自己完成 TXT 记录添加”,从而跳过交互式确认,直接进入申请流程
执行命令后,会提示添加TXT解析,按要求添加后,等几分钟txt解析成功后,再执行:
./acme.sh --renew --dnssleep 900 -d *.12300.cc.cd --yes-I-know-dns-manual-mode-enough-go-ahead-please或者:
第1步:生成txt:
acme.sh –make-dns-persist-value -d 域名
例如:
root@QQGV5DTy8tVzMoK:~/.acme.sh# ./acme.sh --make-dns-persist-value -d *.12300.cc.cd结果如下:
.....
[Wed Sep  2 13:32:25 UTC 2026] TXT persist domain:_validation-persist.12300.cc.cd
[Wed Sep  2 13:32:25 UTC 2026] TXT persist value :"letsencrypt.org; accounturi=https://acme-v02.api.letsencrypt.org/acme/acct/3699644745; policy=wildcard"
........第2步:然后,在域名厂商里添加dns的txt值
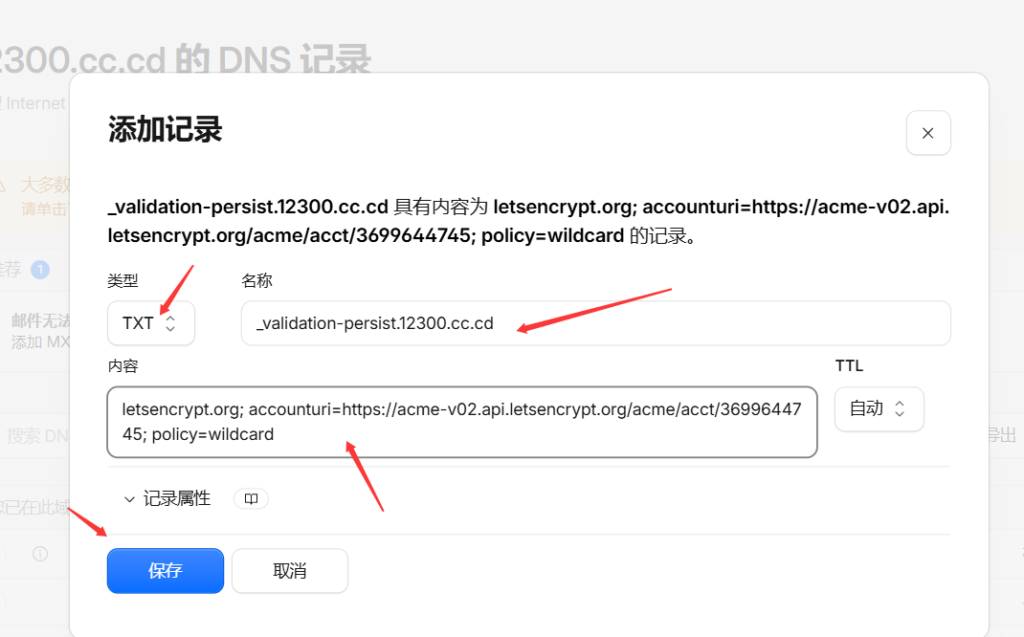
查看txt是否生效:
dig @8.8.8.8 TXT _validation-persist.12300.cc.cd
或者:nslookup -type=TXT _validation-persist.12300.cc.cd
结果如下:
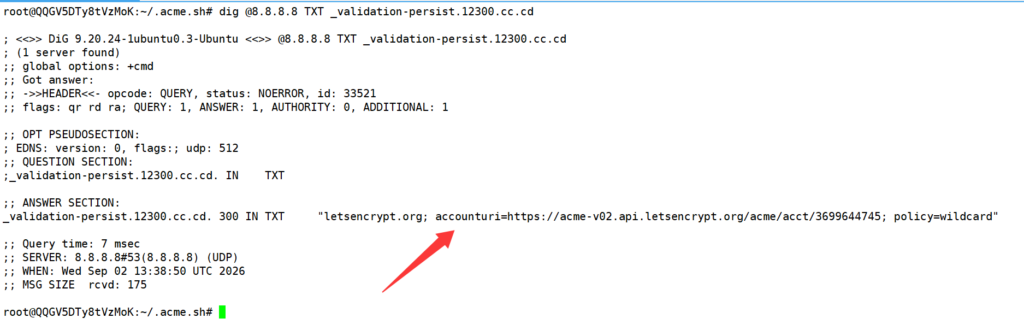
第3步:最后,生成证书:
acme.sh --issue -d 域名 --dns-persist3)更新证书
acme.sh --renew -d example.com --force–force:强制更新
查看下次更新时间
acme.sh --info -d 域名4)更新acme
升级 acme.sh 到最新版:
acme.sh --upgrade开启自动升级:
acme.sh --upgrade --auto-upgrade关闭自动更新: acme.sh –upgrade –auto-upgrade 0
5)删除证书
删除证书命令:acme.sh –remove -d 域名
6)cloudflare
结合cloudflare用法:https://github.com/acmesh-official/acme.sh/wiki/dnsapi#dns_cf
四、其他
杂项,定期更新证书示例:
15 0 * * * "/root/.acme.sh"/acme.sh --cron --home "/root/.acme.sh" > /dev/nullp

0 0 1 * * /root/certbot-auto renew --disable-hook-validation --renew-hook "/etc/init.d/nginx reload" > /root/ssl.renew.txt

0 0 1 2,4,6,8,10,12 *  /snap/bin/certbot renew  --disable-hook-validation --renew-hook "/etc/init.d/nginx reload" > /root/ssl.renew.txt

0 3 * * * /usr/bin/certbot renew --quiet --dns-cloudflare --dns-cloudflare-credentials /etc/letsencrypt/cloudflare.ini > /root/ssl.renew.txt