一、Ansible介绍
ansible介绍:
不需要安装客户端,通过sshd去通信(需要做好sshd密钥认证)
基于模块工作,模块可以使用任何语言开发
不仅支持命令行使用模块,也支持编写yaml格式的playbook,易于编写和阅读
安装十分方便,centos上可以直接yum安装
有提供GUI图形界面:www.ansible.com/tower,收费的
ansible被红帽收购了
官方文档:https://docs.ansible.com/ansible/latest/index.html
中文教程:https://ansible-book.gitbooks.io/ansible-first-book/content/
二、ansible安装
1、yum安装ansible
[root@lb01 ~]# yum install ansible -y
2、做ssh免密登录密钥认证。
[root@lb01 ~]# ssh-keygen Generating public/private rsa key pair.Enter file in which to save the key (/root/.ssh/id_rsa):
/root/.ssh/id_rsa already exists.Overwrite (y/n)? y
Enter passphrase (empty for no passphrase):
Enter same passphrase again:
Your identification has been saved in /root/.ssh/id_rsa.
Your public key has been saved in /root/.ssh/id_rsa.pub.
The key fingerprint is:
SHA256:orKC9yrUB5XjZ1tTXJSpqDSbqNcuGE65TZ9YkBWj9eE root@lb01
The key's randomart image is:
+---[RSA 2048]----+
|      .+... ooo  |
|     +o.+ .o o   |
|    o.+  Eo .    |
|   . + = + .     |
|  . o B S .      |
| . = = B         |
|o + X = .        |
|+ .B = +         |
| +ooo o.         |
+----[SHA256]-----+
[root@lb01 ~]# [root@lb01 ~]# ssh-copy-id root@192.168.10.101/usr/bin/ssh-copy-id: INFO: Source of key(s) to be installed: "/root/.ssh/id_rsa.pub"
/usr/bin/ssh-copy-id: INFO: attempting to log in with the new key(s), to filter out any that are already installed
/usr/bin/ssh-copy-id: INFO: 1 key(s) remain to be installed -- if you are prompted now it is to install the new keys
root@192.168.10.101's password:

Number of key(s) added: 1

Now try logging into the machine, with:   "ssh 'root@192.168.10.101'"
and check to make sure that only the key(s) you wanted were added.

[root@lb01 ~]# ssh-copy-id root@192.168.10.102
/usr/bin/ssh-copy-id: INFO: Source of key(s) to be installed: "/root/.ssh/id_rsa.pub"
/usr/bin/ssh-copy-id: INFO: attempting to log in with the new key(s), to filter out any that are already installed
/usr/bin/ssh-copy-id: INFO: 1 key(s) remain to be installed -- if you are prompted now it is to install the new keys
root@192.168.10.102's password:

Number of key(s) added: 1

Now try logging into the machine, with:   "ssh 'root@192.168.10.102'"
and check to make sure that only the key(s) you wanted were added.

[root@lb01 ~]#
这里只做两台机子的免密登录,192.168.10.101、192.168.10.102
其中,192.168.10.101安装ansible
3、配置ansible的hosts文件
[root@lb01 ~]# vim /etc/ansible/hosts[servers]192.168.10.101192.168.10.102
[servers]:为组名,自定义
三、ansible远程执行命令
远程执行命令:ansible 组名 -m 模块 -a '命令'
[root@lb01 ~]# ansible servers -m command -a 'ls'192.168.10.101 | SUCCESS | rc=0 >>
anaconda-ks.cfg
centos-7-x86_64-minimal.tar.gzkeepalived-2.0.6
keepalived-2.0.6.tar.gz
my-cetnos7.tar
nginx-1.14.0
nginx-1.14.0.tar.gz

192.168.10.102 | SUCCESS | rc=0 >>
anaconda-ks.cfg
keepalived-2.0.6keepalived-2.0.6.tar.gz
myproject
nginx-1.14.0nginx-1.14.0.tar.gz
sample

[root@lb01 ~]#
使用shell模块:
[root@lb01 ~]# ansible 127.0.0.1 -m shell -a 'w'127.0.0.1 | SUCCESS | rc=0 >> 13:21:44 up 12 min,  1 user,  load average: 0.13, 1.30, 1.29USER     TTY      FROM             LOGIN@   IDLE   JCPU   PCPU WHAT
root     pts/0    192.168.10.1     13:12    8.00s  2.51s  0.02s w

[root@lb01 ~]#
四、ansible拷贝文件或目录
拷贝文件或目录要使用copy模块,比如:
[root@lb01 ~]# ansible 192.168.10.102 -m copy -a "src=/etc/ansible dest=/tmp owner=root group=root mod=755"192.168.10.102 | SUCCESS => {    "changed": true,
    "dest": "/tmp/",
    "src": "/etc/ansible"}
[root@lb01 ~]#
注意:源目录会放到目标目录下面去,如果目标制定的目录不存在,则会自动创建。如果拷贝的是文件,dest指定的名字和源文件不同,并且它不是已经存在的目录,相当于拷贝过去后又重命名。但相反,如果dest是目标机器上已经存在的目录,则会直接把文件拷贝到该目录下。
[root@lb01 ~]# ansible 192.168.10.102 -m copy -a "src=/etc/passwd dest=/tmp/123"192.168.10.102 | SUCCESS => {    "changed": true,
    "checksum": "b230ebaa79927e9369eeb4a41c4acd3156095276",
    "dest": "/tmp/123/passwd",
    "gid": 0,
    "group": "root",
    "md5sum": "c552b951a8d1a592f799bfe408571fac",
    "mode": "0644",
    "owner": "root",
    "size": 1367,
    "src": "/root/.ansible/tmp/ansible-tmp-1535693205.48-96045408061935/source",
    "state": "file",
    "uid": 0}
[root@lb01 ~]#
在192.168.10.102查看一下:
[root@lb02 ~]# ls /tmp/123/aaa  passwd
[root@lb02 ~]#
passwd文件已经拷贝过去。
五、ansible远程执行脚本
1、创建一个脚本文件,比如/tmp/test.sh
[root@lb01 ~]# vim /tmp/test.sh#!/bin/bashecho `date` > /tmp/ansible_test.txt
2、将脚本分发到各个机器
[root@lb01 ~]# ansible servers -m copy -a "src=/tmp/test.sh dest=/tmp/test_script/ mode=0755"
3、批量执行脚本
[root@lb01 ~]# ansible servers -m shell -a "/tmp/test_script/test.sh"192.168.10.102 | SUCCESS | rc=0 >>192.168.10.101 | SUCCESS | rc=0 >>


[root@lb01 ~]#
查看一下:
[root@lb01 ~]# cat /tmp/ansible_test.txt Fri Aug 31 13:38:53 CST 2018[root@lb01 ~]#
OK,执行成功。
shell模块支持管道,command模块不支持管道:
[root@lb01 ~]# ansible servers -m shell -a "cat /etc/passwd | wc -l"192.168.10.102 | SUCCESS | rc=0 >>23192.168.10.101 | SUCCESS | rc=0 >>28[root@lb01 ~]# [root@lb01 ~]# ansible servers -m command -a "cat /etc/passwd | wc -l"192.168.10.102 | FAILED | rc=1 >>cat: invalid option -- 'l'Try 'cat --help' for more information.non-zero return code192.168.10.101 | FAILED | rc=1 >>cat: invalid option -- 'l'Try 'cat --help' for more information.non-zero return code

[root@lb01 ~]#
注意:使用shell模块远程执行脚本,得先把脚本分发到各个机器。如果使用script模块,则不需要把脚本分发到各个机器。
六、ansible管理任务计划
cron模块用户管理任务计划。比如:
1、添加任务计划:
[root@lb01 ~]# ansible servers -m cron -a "name='test cron' job='/usr/bin/echo haha' weekday=6"192.168.10.102 | SUCCESS => {    "changed": true,
    "envs": [],
    "jobs": [        "test cron"
    ]
}192.168.10.101 | SUCCESS => {    "changed": true,
    "envs": [],
    "jobs": [        "test cron"
    ]
}
[root@lb01 ~]#
查看一下任务计划:
[root@lb01 ~]# crontab -l#Ansible: test cron* * * * 6 /usr/bin/echo haha
[root@lb01 ~]#
添加成功。
时间表示:minute(分钟)、hour(小时)、day(日期)、month(月份)、weekday(星期)
2、删除任务计划
前面已经添加了一个test cron任务计划,要想删除此任务计划如下:
[root@lb01 ~]# ansible servers -m cron -a "name='test cron' state=absent"192.168.10.102 | SUCCESS => {    "changed": true,
    "envs": [],
    "jobs": []
}192.168.10.101 | SUCCESS => {    "changed": true,
    "envs": [],
    "jobs": []
}
[root@lb01 ~]#
查看一下:
[root@lb01 ~]# crontab -l[root@lb01 ~]#
删除成功。
注意:不能使用crontab -e去编辑ansible添加的任务计划。
七、ansible安装包和服务管理
1、使用ansible的yum模块安装httpd
[root@lb01 ~]# ansible servers -m yum -a "name=httpd"
2、卸载httpd:
[root@lb01 ~]# ansible servers -m yum -a "name=httpd state=removed"
3、启动httpd服务
前面已经卸载了httpd,所以要重新安装。
[root@lb01 ~]# ansible servers -m yum -a "name=httpd"
使用service模块启动httpd服务:
[root@lb01 ~]# ansible servers -m service -a "name=httpd state=started enabled=No"
4、anbisle文档使用
ansible-doc -l :列出全部模块
ansible-doc -l 模块名:查看某个模块
八、使用playbook
playbook相当于把模块写入配置文件里,例如:
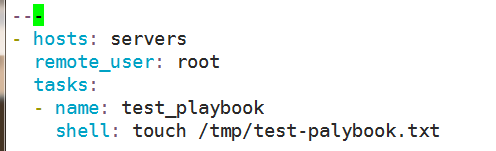
[root@lb01 ~]# vim /etc/ansible/test.yml---
- hosts: servers
  remote_user: root
  tasks:
  - name: test_playbook
    shell: touch /tmp/test-palybook.txt
此playbook的作用是创建/tmp/test-palybook.txt 文件。
解释:
— #第一行必须要3个-,顶格写,新版中可以省略
– hosts: servers # hosts参数指定了对哪些主机进行操作,多台用逗号分隔,也可以使用主机组
remote_user: root #远程执行的用户
tasks: #制定了一个任务
– name: test_playbook #对任务的描述
shell: touch /tmp/test-palybook.txt #shell是模块名,这里使用shell模块
注意空格问题。
执行playbook:
[root@lb01 ~]# ansible-playbook /etc/ansible/test.yml

PLAY [servers] ********************************************************************************************************

TASK [Gathering Facts] ************************************************************************************************
ok: [192.168.10.102]
ok: [192.168.10.101]

TASK [test_playbook] **************************************************************************************************
 [WARNING]: Consider using file module with state=touch rather than running touch

changed: [192.168.10.102]
changed: [192.168.10.101]

PLAY RECAP ************************************************************************************************************192.168.10.101             : ok=2    changed=1    unreachable=0    failed=0
192.168.10.102             : ok=2    changed=1    unreachable=0    failed=0

[root@lb01 ~]#
查看一下:
[root@lb01 ~]# ll /tmp/test-palybook.txt -rw-r--r-- 1 root root 0 Aug 31 14:08 /tmp/test-palybook.txt
[root@lb01 ~]#
OK,文件创建成功。
九、playbook中的变量
一个创建用户的palybook:
[root@lb01 ~]# vim create_user.yml- name: create_user
  hosts: servers
  user: root
  gather_facts: false
  vars:
  - user: "test"
  tasks:
  - name: create user
    user: name="{{user}}"
此playbook创建一个test用户。
解释:
– name: create_user
hosts: servers
user: root
gather_facts: false #gather_facts参数指定了在以下任务部分执行前,是否先执行setup模块获取主机信息
vars: #vars参数,指定了变量
– user: "test" #变量名为user,值为:test,变量值要用双引号引起来
tasks:
– name: create user
user: name="{{user}}" #user为user模块,name是user模块的一个参数,“{{user}}"调用user变量的值
执行playbook:
[root@lb01 ~]# vim create_user.yml
[root@lb01 ~]# ansible-playbook create_user.yml

PLAY [create_user] ****************************************************************************************************TASK [create user] ****************************************************************************************************changed: [192.168.10.102]
changed: [192.168.10.101]

PLAY RECAP ************************************************************************************************************192.168.10.101             : ok=1    changed=1    unreachable=0    failed=0
192.168.10.102             : ok=1    changed=1    unreachable=0    failed=0

[root@lb01 ~]#
查看一下test用户是否创建:
[root@lb01 ~]# id testuid=1001(test) gid=1001(test) groups=1001(test)[root@lb01 ~]#
十、playbook中的循环
1、创建一个playbook:
[root@lb01 ~]# vim while.yml- hosts: servers
  user: root
  tasks:
  - name: change mode for files
    file: path=/tmp/{{item}} mode=600
    with_items:
      - 1.txt
      - 2.txt
      - 3.txt
说明:with_items为循环对象。将/tmp/1.txt、2.txt、3.txt文件的权限改为600
2、创建/tmp/1.txt、2.txt、3.txt文件
[root@lb01 ~]# touch /tmp/{1.txt,2.txt,3.txt}[root@lb01 ~]#
3、执行playbook
[root@lb01 ~]# ansible-playbook while.yml
由于192.168.10.102没有创建/tmp/1.txt、2.txt、3.txt所以报错。
查看lb01上的tmp/1.txt、2.txt、3.txt
[root@lb01 ~]# ll /tmp/?.txt-rw------- 1 root root 0 Aug 31 22:59 /tmp/1.txt
-rw------- 1 root root 0 Aug 31 22:59 /tmp/2.txt
-rw------- 1 root root 0 Aug 31 22:59 /tmp/3.txt
[root@lb01 ~]#
OK,文件权限为600。
十一、playbook中的条件判断
1、创建一个playbook
[root@lb01 ~]# vim when.yml- hosts: servers
  user: root
  gather_facts: True
  tasks:
  - name: use when
    shell: touch /tmp/when.txt    when: ansible_ens33.ipv4.address=="192.168.10.102"
此playbook判断当ip为192.168.10.102的主机就创建/tmp/when.txt文件
2、执行playbook
[root@lb01 ~]# ansible-playbook when.yml

PLAY [servers] ********************************************************************************************************

TASK [Gathering Facts] ************************************************************************************************
ok: [192.168.10.101]
ok: [192.168.10.102]

TASK [use when] *******************************************************************************************************skipping: [192.168.10.101]
 [WARNING]: Consider using file module with state=touch rather than running touch

changed: [192.168.10.102]

PLAY RECAP ************************************************************************************************************192.168.10.101             : ok=1    changed=0    unreachable=0    failed=0
192.168.10.102             : ok=2    changed=1    unreachable=0    failed=0

[root@lb01 ~]#
分别查看192.168.10.101、102的/tmp目录:
[root@lb01 ~]# ls /tmp/when.txtls: cannot access /tmp/when.txt: No such file or directory
[root@lb01 ~]#
192.168.10.102:
[root@lb02 ~]# ls /tmp/when.txt /tmp/when.txt
[root@lb02 ~]#
查看某个机子的facts信息:
ansible 主机 -m setup
[root@lb01 ~]# ansible 192.168.10.101  -m setup192.168.10.101 | SUCCESS => {    "ansible_facts": {        "ansible_all_ipv4_addresses": [            "172.17.0.1",
            "192.168.10.101"
        ],
        "ansible_all_ipv6_add
。。。
十二、playbook中的handlers
handlers:执行task之后,服务器发生变化之后要执行的一些操作。比如修改了配置文件,就需要重启服务。
1、创建一个playbook:
[root@lb01 ~]# vim handlers.yml- name: handlers test  hosts: servers  user: root  tasks:
    - name: copy file      copy: src=/etc/passwd dest=/tmp/aaa.txt      notify: test handlers  handlers:
    - name: test handlers      shell: echo "2222" >> /tmp/aaa.txt
此playbook,只有copy模块真正执行之后,才会去调用下面的handlers相关的操作。
notify:tasks执行成功后,会调用handlers,notify的值与handlers中的name值相同,在上面的脚本中就是:test handlers。此值是自定义的。
注意:此playbook作用是复制文件,如果源文件和目标文件的内容一样,则不会执行copy模块,copy模块不执行那么就不会执行notify,也就不会执行handlers。
2、执行
[root@lb01 ~]# ansible-playbook handlers.yml

PLAY [handlers test] **************************************************************************************************TASK [Gathering Facts] ************************************************************************************************
ok: [192.168.10.102]
ok: [192.168.10.101]

TASK [copy file] ******************************************************************************************************
changed: [192.168.10.101]
changed: [192.168.10.102]

RUNNING HANDLER [test handlers] ***************************************************************************************
changed: [192.168.10.102]
changed: [192.168.10.101]

PLAY RECAP ************************************************************************************************************192.168.10.101             : ok=3    changed=2    unreachable=0    failed=0
192.168.10.102             : ok=3    changed=2    unreachable=0    failed=0

[root@lb01 ~]#
查看:
[root@lb01 ~]# tail /tmp/aaa.txt tss:x:59:59:Account used by the trousers package to sandbox the tcsd daemon:/dev/null:/sbin/nologingit:x:1000:1000::/var/opt/gitlab:/bin/shgitlab-www:x:997:993::/var/opt/gitlab/nginx:/bin/falsegitlab-redis:x:996:992::/var/opt/gitlab/redis:/bin/falsegitlab-psql:x:995:991::/var/opt/gitlab/postgresql:/bin/shgitlab-prometheus:x:994:990::/var/opt/gitlab/prometheus:/bin/shapache:x:48:48:Apache:/usr/share/httpd:/sbin/nologinsaslauth:x:993:76:Saslauthd user:/run/saslauthd:/sbin/nologintest:x:1001:1001::/home/test:/bin/bash2222[root@lb01 ~]#
显然,handlers操作已执行。
十三、使用playbook安装nginx
1、在lb01(192.168.10.101)主机上编译安装好nginx
编译安装过程省略。nginx编译目录:/usr/local/nginx/
2、创建/etc/ansible/nginx_install目录
[root@lb01 ~]# mkdir /etc/ansible/nginx_install
在nginx_install创建以下目录:
[root@lb01 ~]# cd /etc/ansible/nginx_install[root@lb01 nginx_install]# [root@lb01 nginx_install]# mkdir -p roles/{common,install}/{handlers,files,meta,tasks,templates,vars}
目录说明:
roles 此目录中有common、install两个目录
├── common 此目录为一些准备操作
│ ├── files 此目录存放一些安装nginx时用到的文件
│ ├── handlers 当发生改变时要执行的操作,比如配置文件发生改变了,就要重启nginx服务
│ ├── meta 此目录存放说明信息
│ ├── tasks 存放核心的配置文件
│ ├── templates 存放一些配置文件,启动脚本等模块文件
│ └── vars 自定义变量
└── install 此目录为安装nginx操作。
├── files
├── handlers
├── meta
├── tasks
├── templates
└── vars
3、将编译的nginx打包
[root@lb01 nginx_install]# cd /usr/local/[root@lb01 local]# ls nginx/client_body_temp  conf  conf.d  fastcgi_temp  html  logs  proxy_temp  sbin  scgi_temp  uwsgi_temp
[root@lb01 local]# [root@lb01 local]# tar cf nginx.tar.gz --exclude "nginx.conf" --exclude "conf.d" nginx/[root@lb01 local]# lsbin  etc  games  include  keepalived  lib  lib64  libexec  nginx  nginx.tar.gz  sbin  share  src
[root@lb01 local]# mv nginx.tar.gz  /etc/ansible/nginx_install/roles/install/files/[root@lb01 local]#
nginx打包后放到/etc/ansible/nginx_install/roles/install/files/目录中。
将nginx的nginx.conf,conf.d/server.conf,/etc/rc.d/init.d/nginx文件复制到/etc/ansible/nginx_install/roles/install/templates/目录中
/etc/rc.d/init.d/nginx为nginx启动脚本,需自己创建。
[root@lb01 local]# cp nginx/conf/nginx.conf /etc/ansible/nginx_install/roles/install/templates/[root@lb01 local]# cp nginx/conf.d/server.conf /etc/ansible/nginx_install/roles/install/templates/[root@lb01 local]# cp /etc/rc.d/init.d/nginx /etc/ansible/nginx_install/roles/install/templates/
4、定义common的tasks
[root@lb01 local]# cd /etc/ansible/nginx_install/roles/common/[root@lb01 common]# vim tasks/main.yml- name: Install initializtion require software
  yum: name={{ item }} state=installed
  with_items:
    - zlib-devel
    - pcre-devel
5、定义变量
[root@lb01 common]# vim /etc/ansible/nginx_install/roles/install/vars/main.ymlnginx_user: wwwnginx_port: 80nginx_basedir: /usr/local/nginx
6、定义拷贝nginx相关文件的playbook:
[root@lb01 ~]# cd /etc/ansible/nginx_install/[root@lb01 nginx_install]# [root@lb01 nginx_install]# vim roles/install/tasks/copy.yml- name: Copy Nginx Software
  copy: src=nginx.tar.gz dest=/tmp/nginx.tar.gz owner=root group=root
- name: Uncompression Nginx Software
  shell: tar xf /tmp/nginx.tar.gz -C /usr/local
- name: Copy Nginx Start Script
  template: src=nginx dest=/etc/rc.d/init.d/nginx owner=root group=root mode=0755- name: Copy Nginx Config
  template: src=nginx.conf dest={{ nginx_basedir }}/conf/ owner=root group=root mode=0644- name: Copy Nginx Virtual Config
  template: src=server.conf dest={{ nginx_basedir }}/conf.d/ owner=root group=root mode=0644
7、创建用户,启动服务,删除压缩包
[root@lb01 nginx_install]# vim roles/install/tasks/install.yml- name: Create Nginx User
  user: name={{ nginx_user }} state=present createhome=no shell=/sbin/nologin- name: Start Nginx Service
  shell: /etc/rc.d/init.d/nginx start
- name:  Add Boot Start Nginx Service
  shell: chkconfig --add nginx
- name: Delete Nginx compression files
  shell: rm -rf /tmp/nginx.tar.gz
8、创建总的playbook,调用copy,install的playbook
[root@lb01 nginx_install]# vim roles/install/tasks/main.yml- include: copy.yml
- include: install.yml
至此,两个roles:common、install定义完成。
9、定义一个总入口配置文件
[root@lb01 nginx_install]# pwd/etc/ansible/nginx_install
[root@lb01 nginx_install]# vim install.yml---
- hosts: servers
  remote_user: root
  gather_facts: True
  roles:
    - common
    - install
10、执行总入口的playbook
[root@lb01 nginx_install]# pwd
/etc/ansible/nginx_install
[root@lb01 nginx_install]# ansible-playbook install.yml
[DEPRECATION WARNING]: The use of 'include' for tasks has been deprecated. Use 'import_tasks' for static inclusions or 'include_tasks' for dynamic inclusions. This feature
 will be removed in a future release. Deprecation warnings can be disabled by setting deprecation_warnings=False in ansible.cfg.
[DEPRECATION WARNING]: include is kept for backwards compatibility but usage is discouraged. The module documentation details page may explain more about this rationale.. This feature will be removed in a future release. Deprecation warnings can be disabled by setting deprecation_warnings=False in ansible.cfg.

PLAY [servers] *************************************************************************************************************************************************************

TASK [Gathering Facts] *****************************************************************************************************************************************************
ok: [192.168.10.102]
ok: [192.168.10.101]

TASK [common : Install initializtion require software] *********************************************************************************************************************
ok: [192.168.10.102] => (item=[u'zlib-devel', u'pcre-devel'])
ok: [192.168.10.101] => (item=[u'zlib-devel', u'pcre-devel'])

TASK [install : Copy Nginx Software] ***************************************************************************************************************************************ok: [192.168.10.102]
ok: [192.168.10.101]

TASK [install : Uncompression Nginx Software] ******************************************************************************************************************************
 [WARNING]: Consider using unarchive module rather than running tar

changed: [192.168.10.102]
changed: [192.168.10.101]

TASK [install : Copy Nginx Start Script] ***********************************************************************************************************************************
ok: [192.168.10.102]
ok: [192.168.10.101]

TASK [install : Copy Nginx Config] *****************************************************************************************************************************************
changed: [192.168.10.102]
changed: [192.168.10.101]

TASK [install : Copy Nginx Virtual Config] *********************************************************************************************************************************
changed: [192.168.10.102]
changed: [192.168.10.101]

TASK [install : Create Nginx User] *****************************************************************************************************************************************
ok: [192.168.10.102]
ok: [192.168.10.101]

TASK [install : Start Nginx Service] ***************************************************************************************************************************************changed: [192.168.10.102]
changed: [192.168.10.101]

TASK [install : Add Boot Start Nginx Service] ******************************************************************************************************************************
changed: [192.168.10.101]
changed: [192.168.10.102]

TASK [install : Delete Nginx compression files] ****************************************************************************************************************************
 [WARNING]: Consider using file module with state=absent rather than running rm

changed: [192.168.10.102]
changed: [192.168.10.101]

PLAY RECAP *****************************************************************************************************************************************************************
192.168.10.101             : ok=11   changed=6    unreachable=0    failed=0
192.168.10.102             : ok=11   changed=6    unreachable=0    failed=0

[root@lb01 nginx_install]#
清空防火墙规则,浏览器打开192.168.10.101、192.168.10.102:
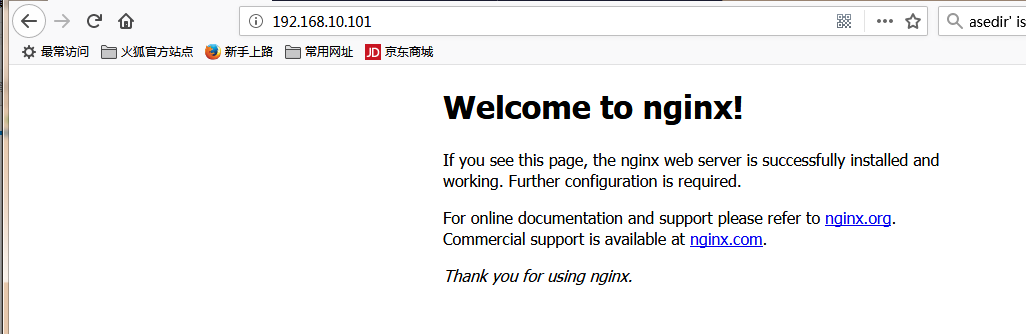
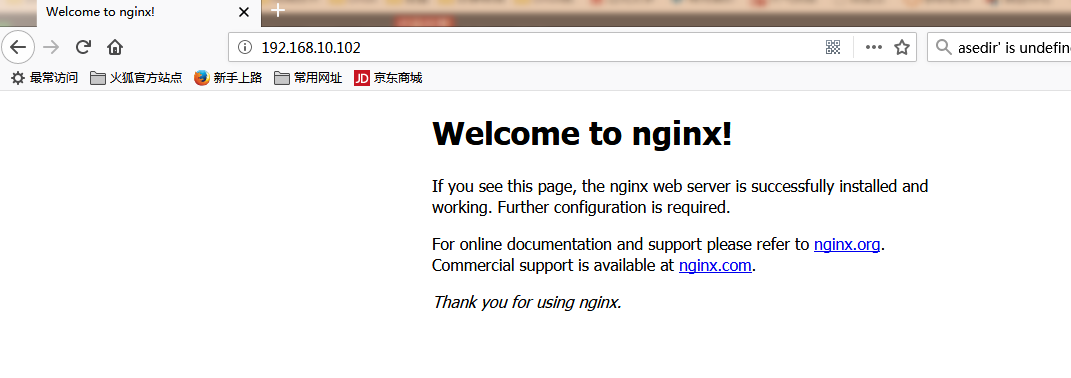
OK,成功。
十四、playbook管理配置文件
生产环境中需要管理配置文件的,安装软件时只是在初始化环境的时候用一下。下面写一个管理nginx配置文件的palybook。
目录结构如下:
[root@lb01 ~]#
[root@lb01 ~]# tree nginx_config/
nginx_config/
├── roles
│ ├── lod
│ │ ├── files
│ │ ├── handlers
│ │ ├── tasks
│ │ └── vars
│ └── new
│ ├── files
│ │ ├── conf.d
│ │ │ └── server.conf
│ │ └── nginx.conf
│ ├── handlers
│ │ └── main.yml
│ ├── nginx.conf
│ ├── tasks
│ │ └── main.yml
│ └── vars
│ └── main.yml
└── update.yml12 directories, 7 files
[root@lb01 ~]#
1、创建一个nginx_config目录
这里在root目录下创建。
[root@lb01 ~]# mkdir nginx_config/roles/{new,lod}/{files,handlers,vars,tasks} -p[root@lb01 ~]#
其中,new为更新时用到的目录,old为回滚时用到的目录,files为nginx.conf和虚拟主机配置文件,handlsers为启动nginx服务的命令。
2、把相关配置文件放到files里面
[root@lb01 ~]# cd /usr/local/nginx[root@lb01 nginx]# cp -r conf.d/ conf/nginx.conf /root/nginx_config/roles/new/files/
这里是nginx使用编译安装,虚拟主机配置文件目录为安装目录下的conf.d
3、new目录相关配置
(1)定义变量
[root@lb01 ~]# cd nginx_config/[root@lb01 nginx_config]# vim roles/new/vars/main.ymlnginx_basedir: /usr/local/nginx
(2)配置handlers
[root@lb01 nginx_config]# vim roles/new/handlers/main.yml- name: restart nginx
  shell: /usr/local/nginx/sbin/nginx -s reload
(3)配置核心的任务
[root@lb01 nginx_config]# vim roles/new/tasks/main.yml- name: copy conf file
  copy: src={{ item.src }} dest={{ nginx_basedir }}/{{ item.dest }} backup=yes owner=root group=root mode=0644
  with_items:
    - { src: nginx.conf,dest: conf/nginx.conf }
    - { src: conf.d,dest: }
  notify: restart nginx
(4)定义总入口
[root@lb01 nginx_config]# pwd/root/nginx_config
[root@lb01 nginx_config]# vim update.yml---
- hosts: servers
  user: root
  roles:
    - new
(5)执行测试
修改一下server.conf之后执行:
[root@lb01 nginx_config]# ansible-playbook update.yml

PLAY [servers] ********************************************************************************************************

TASK [Gathering Facts] ************************************************************************************************
ok: [192.168.10.102]
ok: [192.168.10.101]

TASK [new : copy conf file] *******************************************************************************************
ok: [192.168.10.102] => (item={u'dest': u'conf/nginx.conf', u'src': u'nginx.conf'})
ok: [192.168.10.101] => (item={u'dest': u'conf/nginx.conf', u'src': u'nginx.conf'})
changed: [192.168.10.101] => (item={u'dest': None, u'src': u'conf.d'})
changed: [192.168.10.102] => (item={u'dest': None, u'src': u'conf.d'})

RUNNING HANDLER [new : restart nginx] *********************************************************************************
changed: [192.168.10.102]
changed: [192.168.10.101]

PLAY RECAP ************************************************************************************************************192.168.10.101             : ok=3    changed=2    unreachable=0    failed=0
192.168.10.102             : ok=3    changed=2    unreachable=0    failed=0

[root@lb01 nginx_config]#
如果源文件和目标文件内容一样,则不会更新文件:
[root@lb01 nginx_config]# ansible-playbook update.yml

PLAY [servers] ********************************************************************************************************

TASK [Gathering Facts] ************************************************************************************************
ok: [192.168.10.102]
ok: [192.168.10.101]

TASK [new : copy conf file] *******************************************************************************************
ok: [192.168.10.102] => (item={u'dest': u'conf/nginx.conf', u'src': u'nginx.conf'})
ok: [192.168.10.101] => (item={u'dest': u'conf/nginx.conf', u'src': u'nginx.conf'})
ok: [192.168.10.102] => (item={u'dest': None, u'src': u'conf.d'})
ok: [192.168.10.101] => (item={u'dest': None, u'src': u'conf.d'})

PLAY RECAP ************************************************************************************************************192.168.10.101             : ok=2    changed=0    unreachable=0    failed=0
192.168.10.102             : ok=2    changed=0    unreachable=0    failed=0

[root@lb01 nginx_config]#
配置文件的回滚
在修改配置文件之前,先备份。那么更新了修改后的文件,如有问题,则可以使用备份的文件去同步,也就是回滚了。
1、把new下的所有文件备份到old目录里面
[root@lb01 ~]# cd nginx_config/[root@lb01 nginx_config]# rsync -av roles/new/ roles/oldsending incremental file list
created directory roles/old
./
nginx.conf
files/
files/nginx.conf
files/conf.d/files/conf.d/server.conf
handlers/
handlers/main.yml
tasks/
tasks/main.yml
vars/
vars/main.yml

sent 4,318 bytes  received 193 bytes  9,022.00 bytes/sec
total size is 3,674  speedup is 0.81[root@lb01 nginx_config]#
2、创建回滚的playbook
回滚,就用old目录中的文件去覆盖,然后重启nginx服务即可。但每次改动nginx配置文件都先备份到old目录。
[root@lb01 nginx_config]# vim rollback.yml---
- hosts: servers
  user: root
  roles:
    - old
3、测试一下
比如:在nginx.conf文件中添加一行:#hahaha
[root@lb01 nginx_config]# echo "#hahaha" >> /usr/local/nginx/conf/nginx.conf[root@lb01 nginx_config]#
回滚:
[root@lb01 nginx_config]# ansible-playbook rollback.yml
PLAY [servers] ********************************************************************************************************

TASK [Gathering Facts] ************************************************************************************************
ok: [192.168.10.102]
ok: [192.168.10.101]

TASK [old : copy conf file] *******************************************************************************************
ok: [192.168.10.102] => (item={u'dest': u'conf/nginx.conf', u'src': u'nginx.conf'})
changed: [192.168.10.101] => (item={u'dest': u'conf/nginx.conf', u'src': u'nginx.conf'})
ok: [192.168.10.102] => (item={u'dest': None, u'src': u'conf.d'})
ok: [192.168.10.101] => (item={u'dest': None, u'src': u'conf.d'})

RUNNING HANDLER [old : restart nginx] *********************************************************************************
changed: [192.168.10.101]

PLAY RECAP ************************************************************************************************************192.168.10.101             : ok=3    changed=2    unreachable=0    failed=0
192.168.10.102             : ok=2    changed=0    unreachable=0    failed=0

[root@lb01 nginx_config]#